How to Design an Accessible Kitchen Layout for Wheelchair Users: ADA Measurements, Layout Ideas, and Practical Tips
Introduction
This guide explains how to create a kitchen that complies with the Americans with Disabilities Act (ADA) while remaining stylish and functional. Readers will learn the essential measurements, layout strategies, and practical tips that enable independent cooking for wheelchair users. The information is valuable because an accessible kitchen reduces reliance on caregivers and enhances safety during daily meal preparation.
The article is organized into clear steps, each supported by product recommendations that act as tools rather than the focus of the design. By following the instructions, one can transform any existing kitchen or design a new space that meets both regulatory standards and personal preferences.
What You Will Need (Optional)
- Measuring tape and level
- ADA‑compliant sink and faucet
- Adjustable countertop sections
- Pull‑down faucet with ergonomic handle
- Expandable storage units such as pantry shelves and pan organizers
- Basic tools for installation (screwdriver, drill, wrench)
These items can be sourced from local hardware stores or purchased online using the links provided in the step‑by‑step section.
Step 1: Assess Space and Establish ADA Clearances
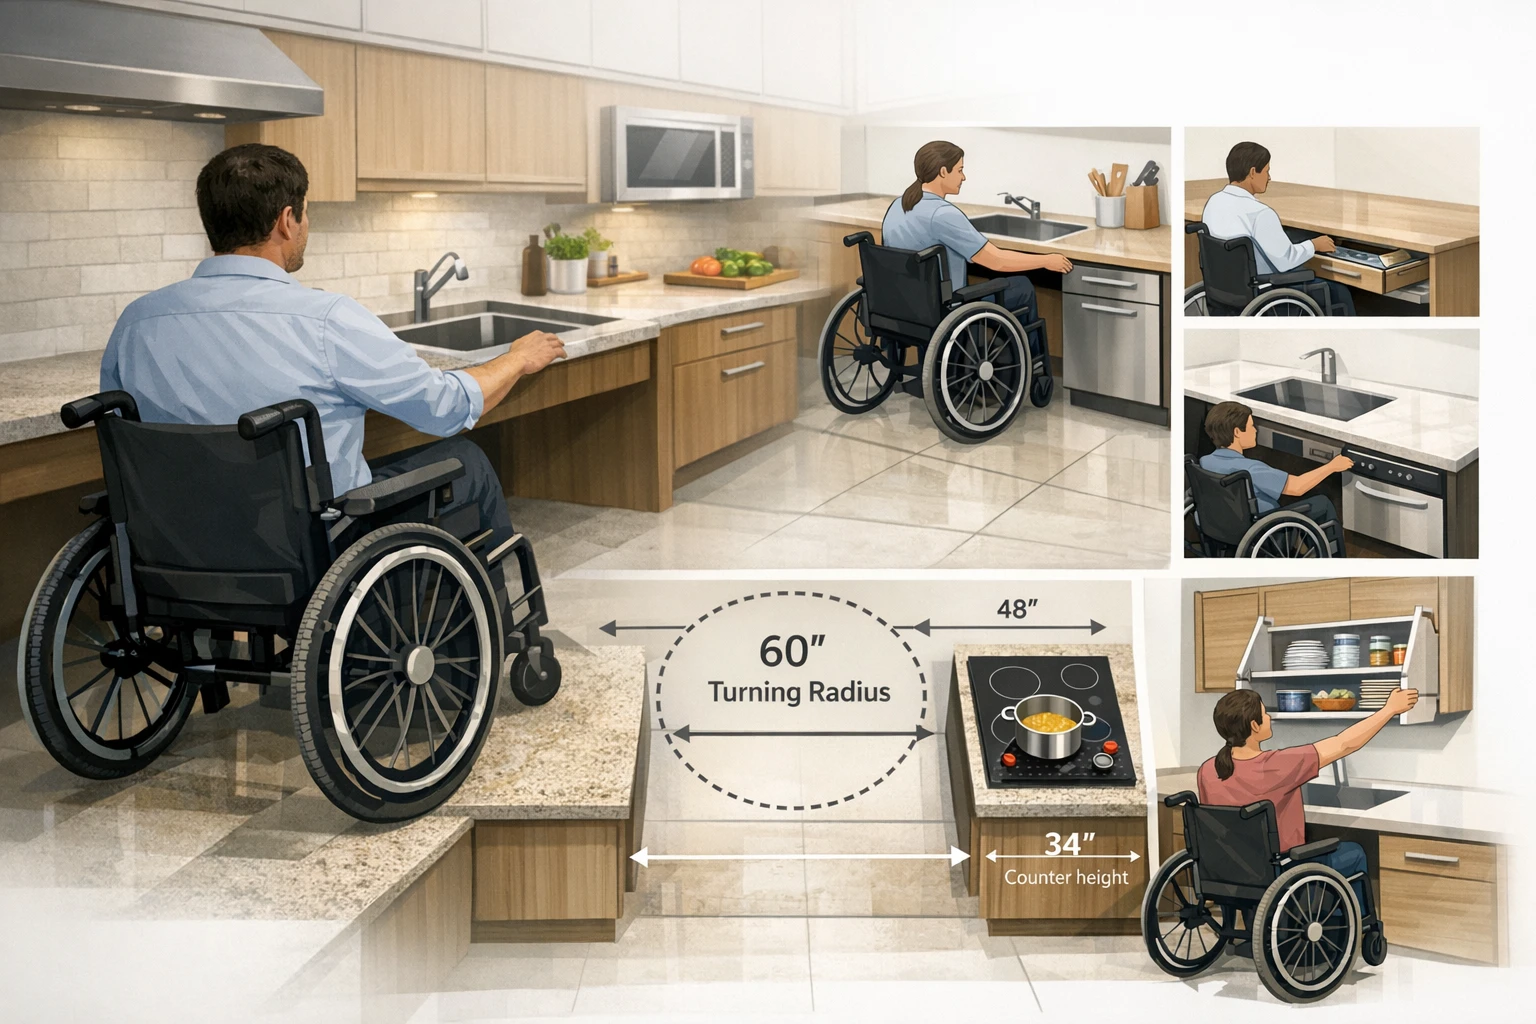
The first task is to measure the floor area that will be available for wheelchair maneuvering. ADA guidelines require a clear floor space of at least 30 inches by 48 inches for a forward‑facing wheelchair, and a 60‑inch turning radius for a 360‑degree turn. Mark these dimensions on the floor with painter’s tape to visualise the usable area.
Next, verify that the pathway to the sink, stove, and refrigerator is free of obstacles. Doorways should have a minimum width of 32 inches when the door is open at a 90‑degree angle. If a doorway is narrower, consider installing a pocket or sliding door to increase clearance.
Finally, note the height of existing countertops. The ADA recommends a countertop height of 34 to 36 inches for wheelchair users, with a knee‑clearance space of at least 27 inches high, 30 inches wide, and 19 inches deep beneath the work surface.
Document these measurements in a floor plan sketch; this will guide the placement of appliances and storage solutions in subsequent steps.
Step 2: Choose an Accessible Sink and Faucet
A sink that is positioned at the appropriate height and includes a shallow basin simplifies wheelchair access. Pair the sink with a pull‑down faucet that can be operated with one hand and reaches the back of the basin without excessive stretching.
One highly recommended option is the WEWE Pull Down Kitchen Faucet. This faucet features a 20‑inch retractable hose, a 360° swivel sprayer, and a high‑arc single‑handle design that enables easy reach across the sink. The faucet is constructed from SUS304 stainless steel, which meets drinking‑water standards, and includes a PEX inner liner for safe water flow. It is treated with seven layers of nanotechnology to resist fingerprints and water spots, reducing maintenance effort. The product is priced at $119.00 and holds a rating of 4.6 out of 5 stars based on 54,489 reviews.
The WEWE faucet also offers a quick‑installation video, allowing homeowners to complete the installation without professional assistance. This reduces overall project cost and enables a faster transition to an accessible kitchen.
If a more industrial aesthetic is desired, the Kraus Bolden Pull Down Kitchen Faucet provides a spot‑free stainless finish and a heavy‑duty metal body. Its 1.8 gpm flow rate and 180° swivel range deliver strong water pressure while maintaining a sleek appearance. Priced at $137.96 with a 4.5‑star rating, this faucet is suitable for users who prefer a commercial‑style look.
Step 3: Install Adjustable Countertops
Countertop height should be set within the ADA‑recommended range of 34 to 36 inches. Adjustable countertop sections allow future modifications as the user’s needs evolve. When installing, ensure that the knee‑clearance space beneath the work surface meets the 27‑by‑30‑by‑19‑inch requirement.
Use a level to verify that the countertop is perfectly horizontal; an uneven surface can cause spills and create hazards for wheelchair users. Secure the countertop to the base cabinets with sturdy brackets, and double‑check that the brackets do not intrude into the knee‑clearance zone.
Consider integrating a backsplash that extends only to the height of the countertop, as this reduces the risk of accidental contact with hot liquids while still providing a clean visual finish.
With the countertop correctly positioned, the user can comfortably slide a wheelchair underneath and reach the work surface without overextending.
Step 4: Integrate the Pull‑Down Faucet
After the sink and countertop are installed, mount the chosen pull‑down faucet according to the manufacturer’s instructions. The WEWE faucet includes a professional installation video that demonstrates how to connect the water lines, attach the sprayer hose, and seal the base to prevent leaks.
When positioning the faucet, align the handle at a height that is reachable from a seated position, typically 32 to 36 inches from the floor. Test the lever action to confirm that it can be operated with a single hand and that the sprayer retracts smoothly after use.
Verify that the water pressure is consistent throughout the spray modes. Users often appreciate a pause button that stops water flow while filling pots; the WEWE faucet includes this feature, reducing water waste.
Secure any exposed plumbing with insulated covers to prevent accidental burns, especially if the kitchen is used by individuals with limited sensation.
Step 5: Add Reachable Storage Solutions
Accessible storage is essential for keeping frequently used items within arm’s reach. Adjustable shelving units and pantry organizers allow customization of height and depth to accommodate a wheelchair’s footrest and leg clearance.
The Jojocross Expandable Pantry Organizer provides a stackable, adjustable shelf system that can be extended from 16.54 to 26.38 inches in length. Each shelf can hold up to 100 lb, making it suitable for pantry staples, dishware, and small appliances. The metal construction is powder‑coated for rust resistance, and the design includes a triangular plate for added stability. Priced at $63.99 with a 4.6‑star rating, this organizer offers flexibility for cabinets of varying widths.
For larger items such as pots and pans, the Simple Houseware Expandable Pan Organizer features ten adjustable compartments that expand from 12 to 22 inches. The heavy‑duty base supports cast‑iron cookware without tipping, and the powder‑coated wire dividers cradle lids securely. At $22.87 and a 4.6‑star rating, this organizer maximises vertical space inside cabinets or on countertops.
If a freestanding pantry is preferred, the FJTJBSI 50" Pantry Cabinet offers three adjustable shelves, motion‑sensor LED lighting, and a sleek grey finish. The LED lights activate when the doors open, improving visibility for users with limited reach. The cabinet measures 24 × 12 × 50 inches and can accommodate a variety of kitchen items. It is priced at $99.99 with a 4‑star rating.
When installing these storage units, place them at a height that allows the user to retrieve items without standing. A common guideline is to keep the top of the shelf no higher than 48 inches from the floor.
Step 6: Optimize Appliance Placement
Appliances such as the stove, microwave, and dishwasher should be positioned to allow easy access from a seated position. The cooktop should be no higher than 36 inches, and the controls should be reachable without leaning forward.
Consider a slide‑out oven or a drawer‑type microwave that opens at waist height. These designs reduce the need to reach over hot surfaces. For dishwashers, choose a model with a low‑profile front panel that aligns with the countertop height, enabling the user to load dishes without excessive bending.
All appliances should have clear, tactile controls. If the chosen faucet includes a pause button, ensure that similar pause or stop functions are available on other appliances, such as a microwave timer that can be halted with a single press.
Finally, verify that there is at least 36 inches of clearance in front of each appliance to accommodate the wheelchair’s turning radius.
Step 7: Enhance Lighting and Visual Cues
Proper lighting reduces the risk of accidents and assists users with limited vision. Install under‑cabinet LED strips that provide uniform illumination across the countertop. The motion‑sensor LED lights on the FJTJBSI pantry cabinet serve as an excellent example of hands‑free illumination.
Contrast colors between countertops and backsplashes help define work zones. For instance, a light‑colored countertop paired with a darker backsplash creates a visual boundary that guides the user’s movements.
Consider adding tactile markers on the floor near the sink and stove. Simple rubber bumpers can indicate where the user should position the wheelchair for optimal reach.
All lighting controls should be placed at a height of 48 inches or lower, and preferably operated by a wall switch rather than a ceiling switch.
Tips & Pro Tips
- Measure twice before cutting any countertop material to avoid costly rework.
- Use a cordless drill for easier maneuverability in tight spaces.
- Apply silicone sealant around the faucet base to prevent water seepage.
- Label cabinet interiors with large‑print tags to assist users in locating items quickly.
- Test the wheelchair’s maneuverability after each major installation to ensure compliance with the 60‑inch turning radius.
Troubleshooting
Problem: The pull‑down faucet hose retracts slowly.
Solution: Verify that the hose is not twisted and that the spring mechanism is free of debris. If the issue persists, consult the manufacturer’s warranty service.
Problem: Storage shelves wobble under load.
Solution: Ensure that the triangular support plate on the Jojocross organizer is firmly attached to the back wall, and tighten all mounting screws evenly.
Problem: LED lights on the pantry cabinet do not activate.
Solution: Check that the battery is fully charged and that the motion sensor is not obstructed by nearby objects.
Conclusion
Designing an accessible kitchen for wheelchair users requires careful measurement, thoughtful product selection, and attention to detail. By following the steps outlined above, one can create a safe, functional, and aesthetically pleasing space that complies with ADA standards. The recommended tools, such as the WEWE Pull Down Kitchen Faucet and the Jojocross Expandable Pantry Organizer, simplify the implementation of universal‑design principles. Readers are encouraged to apply these guidelines to their own homes and enjoy the independence that an accessible kitchen provides.
Products Mentioned in This Guide
Frequently Asked Questions
What are the key ADA measurements for countertop height and clearance?
Countertops should be 34‑36 inches high with a minimum 24‑inch knee clearance and 48‑inch wide work area for wheelchair access.
How much turning space does a wheelchair need in a kitchen?
A 5‑foot (150 cm) turning radius is required to allow a wheelchair to maneuver safely around appliances and islands.
What sink and faucet features make a kitchen wheelchair‑friendly?
Install an ADA‑compliant sink at 34‑36 inches height with a pull‑down faucet and ergonomic handle for easy reach and operation.
How can I design storage that’s accessible for wheelchair users?
Use adjustable, pull‑out shelves, lower pantry rods to 48‑inches, and place frequently used items within a 24‑inch reach zone.
Are there layout options that avoid obstructing wheelchair paths?
Choose a single‑wall or galley layout with clear 36‑inch pathways and avoid island counters unless they include a removable or lowered section for access.