How to Create Tactile Cooking Labels for Blind Cooks: A DIY Step-by-Step Guide
Introduction
In this guide, one will learn how to design and apply tactile cooking labels that enable blind and visually impaired individuals to identify spices, pantry items, and cookware with confidence. The process combines low‑tech Braille label makers with high‑contrast bump dots, creating a system that is both durable and easy to maintain. By following each step, readers will gain practical skills that reduce reliance on sighted assistance while enhancing kitchen safety. The value of this knowledge extends beyond personal use, offering a replicable model for educators, caregivers, and community programs.
What You’ll Need
- Two‑piece Tellegloww Braille Label Maker – compact plastic device for quickly embossing Braille numerals on paper or thin plastic.
- 200‑piece BLEWAY Braille Bump Dots – silicone tactile stickers in five high‑contrast colors.
- Blank label sheets compatible with the Braille label maker (standard 3‑mm thick paper works well).
- Scissors, a ruler, and a permanent‑marker for optional color‑coding.
- Clean, dry containers such as spice jars, measuring cups, and storage bins.
Step 1: Prepare Your Workspace
Begin by selecting a well‑lit, clutter‑free countertop where all materials can be spread out within arm’s reach. Clean the surface with a mild detergent and allow it to dry completely; any residue could interfere with the adhesive backing of the bump dots. Lay out the blank label sheets, scissors, and ruler in a logical order to minimize unnecessary movement. This organized environment mirrors the systematic approach that blind cooks will later use when locating labeled items.
Step 2: Determine Label Content and Layout
Identify each kitchen item that requires a tactile identifier – common candidates include salt, pepper, cumin, baking powder, and oil varieties. Write the intended label text on a piece of scrap paper, then decide whether the primary identifier will be a Braille numeral, a color‑coded dot, or a combination of both. For spices, a single Braille number (e.g., "1" for salt) paired with a distinct dot color often provides the clearest cue. Document the mapping in a notebook so that the system remains consistent over time.
Step 3: Create Braille Labels Using the Tellegloww Braille Label Maker
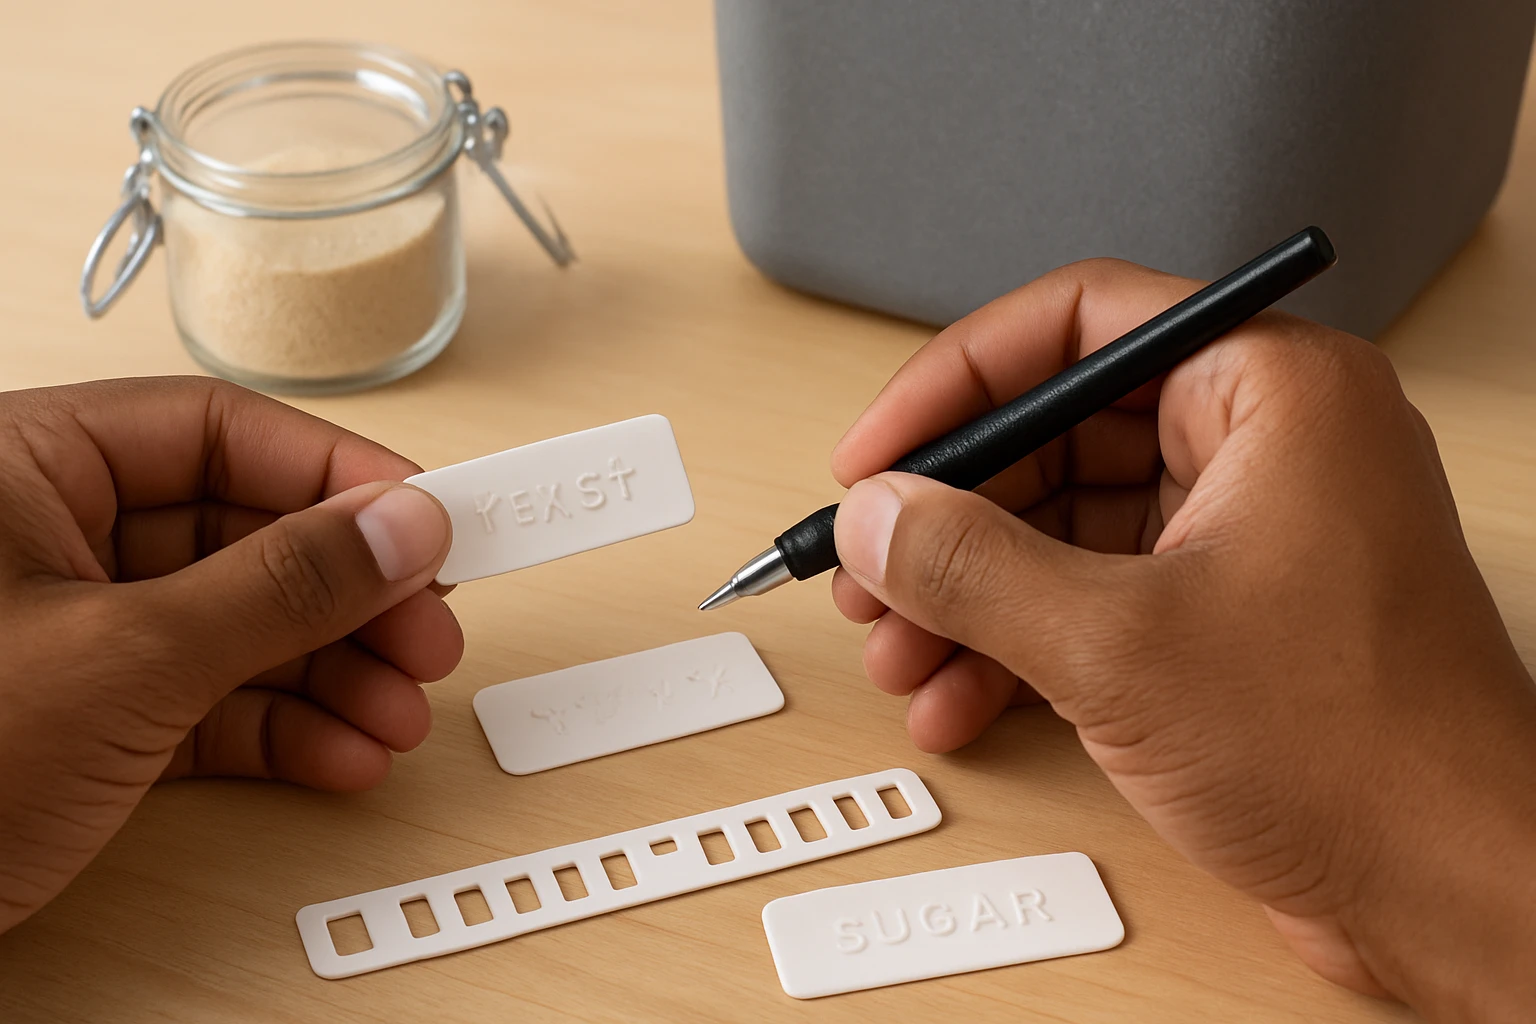
The Tellegloww Braille Label Maker is specifically engineered for blind users, offering a pocket‑sized, orange‑colored plastic device that embosses Braille numerals in seconds. Each unit measures approximately 3.1 inches by 1.5 inches, making it portable enough to attach to a keychain for on‑the‑go labeling. With a 4.7‑star rating from 11 reviews, users praise its reliability and ease of use. To produce a label, insert a small strip of label paper, select the appropriate Braille number using the click mechanism, and press firmly until the tactile imprint appears. Repeat this process for every item on your mapping list, then trim excess paper with scissors for a neat finish.
Step 4: Apply BLEWAY Braille Bump Dots for Color Contrast
After the Braille symbols are affixed, enhance visibility by adding a colored silicone bump dot from the BLEWAY Braille Bump Dots. This 200‑piece pack includes five vibrant colors—purple, red, yellow, green, and blue—each shaped uniquely (X, L, triangle, rectangle, circle), allowing users to develop a personal color‑shape taxonomy. The silicone material is soft enough to press onto paper without tearing, yet durable enough to withstand frequent handling and washing. Choose a dot color that corresponds to the item’s category (for example, red for hot spices, blue for cooling herbs) and press it onto the back of the Braille label, ensuring full contact. The high‑contrast visual cue assists sighted assistants while the tactile shape reinforces identification for the blind cook.
Step 5: Secure Labels to Containers
With both Braille and colored dot in place, attach the completed label to the chosen container. For glass or plastic jars, a thin strip of double‑sided tape provides a strong bond without leaving residue when removed. If the container surface is textured, a small dab of reusable adhesive putty can improve adhesion. Position the label where the user can easily run a fingertip across it—typically the lid or the front face of a jar. Verify that the Braille characters remain raised and the bump dot stays flush; any misalignment could cause confusion during daily use.
Step 6: Test the System with Real‑World Tasks
Conduct a practical test by preparing a simple recipe that requires multiple labeled ingredients. Ask the blind cook to locate each item using only touch, noting the speed and accuracy of identification. If any label is difficult to feel, consider increasing the size of the Braille imprint or adding an additional bump dot for reinforcement. This iterative testing ensures that the labeling system functions reliably under typical kitchen conditions, such as steam, oil splatter, and occasional drops.
Tips & Pro Tips
- Store the Tellegloww Braille Label Maker in a protective pouch when not in use; the plastic construction resists daily wear, but the click mechanism benefits from protection against dust.
- Rotate the colors of the BLEWAY Braille Bump Dots periodically to prevent visual fatigue for sighted helpers; the tactile shapes remain constant, preserving usability.
- For containers that will be washed frequently, laminate the Braille label with a clear, heat‑resistant film before applying the bump dot; this extends label life without sacrificing tactile feedback.
- Maintain a master key (a small notebook) that lists each color‑shape combination and its corresponding ingredient; this reference is invaluable for new kitchen members.
Troubleshooting
Problem: Braille characters feel flat after several washes.
Solution: Re‑emboss the label using the Braille label maker and replace the bump dot if the adhesive has degraded.
Problem: Bump dots peel off when exposed to heat.
Solution: Apply a thin layer of heat‑resistant clear spray before attaching the dot; this creates a stronger bond without affecting tactile feel.
Conclusion
By integrating the portable Tellegloww Braille Label Maker with the versatile BLEWAY Braille Bump Dots, one can construct a robust tactile labeling system that empowers blind cooks to navigate their kitchen independently. The guide provides a repeatable framework that can be adapted to any culinary environment, from home kitchens to professional training facilities. Consistent use of Braille numerals and color‑coded dots not only improves safety but also fosters confidence and autonomy. Readers are encouraged to experiment with additional textures and to share their customized systems with the broader accessibility community.
Products Mentioned in This Guide
Tellegloww Braille Label Maker
Price: $11.99 | Rating: 4.7/5 (11 reviews)
Compact orange plastic device (3.1" x 1.5") that embosses Braille numbers quickly; includes two units for backup.
BLEWAY Braille Bump Dots
Price: $9.99 | Rating: 4.9/5 (32 reviews)
200 silicone tactile stickers in five high‑contrast colors and five unique shapes, designed for visual‑impairment accessibility.
Frequently Asked Questions
What materials are needed to make tactile cooking labels for blind cooks?
You need a Braille label maker, silicone Braille bump‑dot stickers, blank label sheets, scissors, and a laminating sheet or clear tape for durability.
How do I use a Braille label maker to create kitchen labels?
Load the blank sheet, type the desired text or numbers, press the emboss button, then cut the label to size before attaching the bump dots.
Can the tactile labels withstand heat, moisture, and cleaning?
When laminated or covered with waterproof tape, the labels resist steam, splashes, and mild dish‑washing, but avoid direct flame or high‑heat ovens.
How many colors of BLEWAY Braille Bump Dots should I use for easy identification?
Use a distinct color for each spice or item category—typically 3‑5 colors provide clear visual contrast for sighted helpers while the dots remain tactile.
Are there any safety tips when applying tactile labels to cookware?
Ensure the surface is clean and dry, apply the label away from heat‑exposed areas, and test that the sticker stays secure before regular use.