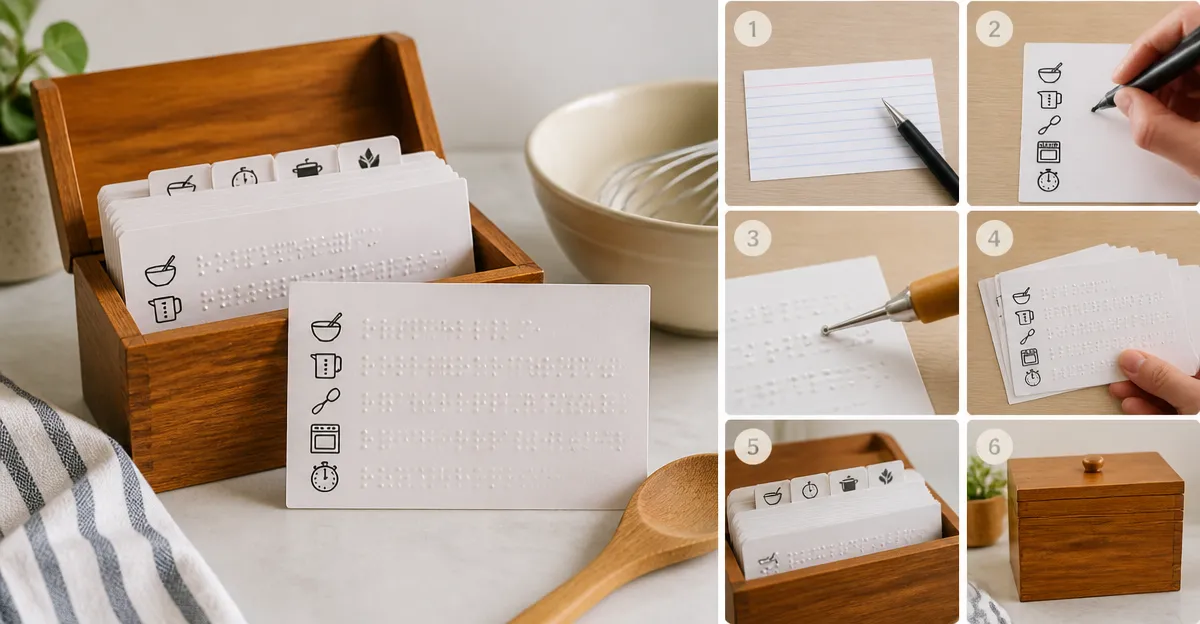
How to Create Tactile Recipe Cards for Mixed‑Vision Families: A Step‑by‑Step DIY Guide to Accessible, High‑Contrast & Braille‑Ready Kitchen Cards
Introduction
Mixed‑vision households often struggle to share recipes because traditional paper cards lack tactile cues and sufficient contrast. This guide teaches readers how to design recipe cards that combine bold visual elements with Braille embossing, ensuring that both low‑vision and blind family members can participate in meal preparation. By the end of the guide, readers will possess a complete workflow—from selecting the right index cards to storing the finished cards in a durable wooden box. The approach balances affordability with durability, making it suitable for everyday kitchen use.
Creating tactile recipe cards not only improves independence but also fosters inclusive family routines. The process relies on readily available products, many of which are highlighted below, yet the instructions remain functional with any comparable supplies. Readers will gain confidence in customizing cards for personal taste while adhering to best practices for accessibility.
What You'll Need
- High‑quality ruled index cards (recommended: Amazon Basics Index Cards or Oxford Index Cards)
- Colored ruled index cards for visual coding (recommended: Nichela Colored Index Cards)
- Embossing tool or Braille label maker
- Fine‑tip permanent markers in high‑contrast colors (black, white, yellow)
- Scissors or a paper cutter
- Dahey Wooden Recipe Box for organized storage (recommended: Dahey Recipe Box)
- Optional: Laminating sheets for extra durability
Step 1: Choose the Right Index Cards
The foundation of any tactile recipe card is the base paper. Amazon Basics Index Cards provide a 1,000‑card bulk at $8.50, rated 4.7/5 from over 32,000 reviews. Their 11 pt. paper stock offers sufficient thickness for embossing while remaining easy to write on with ink pens or markers. The cards are white on one side and ruled on the other, allowing clear separation of ingredient lists and instructions.
For families that prefer a heavier feel, Oxford Index Cards cost $4.99 for 300 cards and share a 4.7/5 rating from 16,500 reviewers. Their classic weight supports both pencil and highlighter use, making them a solid alternative when budget constraints exist.
When color coding is essential—for example, assigning red cards to main dishes and blue cards to desserts—consider Nichela Colored Index Cards. This pack of 300 cards is priced at $6.99 and carries a 4.8/5 rating from 1,200 reviews. The cards feature acid‑free 160 gsm cardstock that resists bleed‑through, ensuring that bold markers remain crisp.
Choosing the appropriate card set influences durability, readability, and the ease of Braille embossing. Thicker cards reduce tearing during embossing, while high‑contrast colors improve visual legibility for low‑vision users.
Step 2: Design a High‑Contrast Layout
Begin by sketching a layout on a plain sheet of paper. Use a 2‑column format: the left column lists ingredients, the right column provides step‑by‑step actions. Employ a black permanent marker for text on white cards, or a white marker on dark‑colored cards from the Nichela pack. High contrast between text and background is critical for low‑vision readability.
When working with colored cards, select a marker color that maximizes contrast. For example, use a bright yellow marker on a navy‑blue card; the resulting luminance difference meets accessibility guidelines for visual contrast ratios above 4.5:1.
After finalizing the layout, transfer it onto the ruled side of the chosen index card. The ruled lines help maintain straight text, but you may choose to write between lines for a cleaner appearance. Keep each line no longer than 30 characters to avoid crowding.
For families that enjoy a decorative touch, consider adding a thin border with a metallic marker. The border should be no thicker than 1 mm to preserve space for Braille dots.
Step 3: Add Braille Labels
To make the cards usable by blind family members, emboss Braille labels for the recipe title and key sections (e.g., "Ingredients," "Directions"). A handheld Braille label maker, such as a Dymo embossing tool, works well with the 11 pt. stock of Amazon Basics Index Cards. The cards’ thickness ensures that the raised dots are tactile without tearing the paper.
Place the Braille label at the top edge of the card, leaving a 5 mm margin to avoid interference with printed text. Test the embossing pressure on a spare card before applying it to the final version; too much pressure can compress the card, while too little may produce indistinct dots.
If a label maker is unavailable, a simple embossing stylus can be used to manually press Braille dots. This method requires a steady hand but offers complete control over dot placement.
Remember to maintain consistent Braille cell spacing across all cards; uniformity aids tactile scanning and reduces confusion during cooking.
Step 4: Cut, Trim, and Protect the Cards
Once the text and Braille are applied, trim any excess card edges to achieve a uniform 3 × 5 inches size. A paper cutter provides clean, straight cuts, but a sharp pair of scissors works as well. Ensure that the cut edges are smooth to prevent snagging on the recipe box slots.
For added durability, especially in a kitchen environment where moisture is common, consider laminating each card with a clear self‑adhesive sheet. Laminating preserves both printed text and Braille embossing while allowing the card to be wiped clean.
If lamination is not desired, a quick spray of a water‑resistant sealant can protect the ink without obscuring tactile features. Allow the sealant to dry fully before handling the cards.
Store the trimmed cards in a dry area until they are ready for organization.
Step 5: Organize Cards in a Wooden Recipe Box
The final step is to place the completed cards in a sturdy storage solution. The Dahey Recipe Box offers a compact wooden design priced at $16.99, with a 4.8/5 rating from 428 reviewers. Its grooved slots hold cards securely while the lid protects them from dust and spills.
Insert each card into the appropriate divider tab based on meal type (e.g., breakfast, lunch, dinner). The box includes six dividers, allowing families to categorize recipes by cuisine, dietary restriction, or cooking difficulty.
Because the box is made of high‑quality wood, it can endure frequent opening and closing without warping. Its neutral white finish blends with most kitchen décors, while the sturdy construction ensures long‑term use.
For families with a larger collection, additional Dahey boxes can be stacked, creating a modular filing system that grows with the household’s culinary repertoire.
Tips & Pro Tips
- Use a ruler to align text columns; consistent spacing improves readability for both sighted and blind users.
- When embossing Braille, start with the recipe title; this provides a quick tactile reference before reading the ingredient list.
- Test marker adhesion on a single card before committing to a full batch; some markers may bleed on certain cardstock.
- Consider adding a small tactile symbol (e.g., a raised star) to indicate spicy dishes, using a hot‑glue gun on the card’s corner.
- Refresh laminated cards periodically; exposure to heat can cause the laminate to yellow, reducing contrast.
Troubleshooting
Problem: Braille dots are not raised enough to feel.
Solution: Increase embossing pressure or use a thicker index card such as the Oxford Index Cards, which have a slightly heavier weight.
Problem: Marker ink smears on the card surface.
Solution: Allow ink to dry for at least five minutes before handling, or switch to a pigment‑based permanent marker that adheres better to coated paper.
Problem: Cards slip out of the recipe box.
Solution: Ensure the cards are trimmed to the exact 3 × 5 inches dimensions; oversized cards will not sit properly in the grooved slots.
Conclusion
By following this guide, families can produce tactile, high‑contrast recipe cards that empower every member to participate in cooking. The process leverages affordable, high‑quality index cards, simple embossing tools, and a stylish wooden storage box to create a lasting kitchen resource. Readers are encouraged to experiment with colors, symbols, and organization methods to tailor the system to their unique household needs.
Products Mentioned in This Guide
Frequently Asked Questions
What materials are needed to make tactile recipe cards?
You need high‑contrast index cards, a Braille embosser or label maker, bold markers, and a sturdy storage box.
How do I choose the right contrast for low‑vision users?
Select cards with a dark background and light‑colored text, or vice‑versa, ensuring a contrast ratio of at least 4.5:1.
Can I create Braille‑ready cards without an expensive embosser?
Yes, you can use a manual Braille label maker or adhesive Braille stickers to add tactile text affordably.
What is the best way to organize and store finished recipe cards?
Store them upright in a wooden or metal box with dividers, labeling each section by meal type for easy access.
How often should I update or replace tactile recipe cards?
Replace cards when the embossing wears down or recipes change, typically every 6‑12 months for optimal readability.