How to Modify Utensils for Peripheral Neuropathy: Simple DIY Tips to Improve Grip & Independence
Introduction
Individuals who experience peripheral neuropathy often struggle with reduced sensation and weakened grip strength. This guide will teach readers how to transform ordinary kitchen utensils into comfortable, secure tools that promote independence during meals. The instructions are designed for an intermediate audience and combine low‑cost materials with optional commercial solutions. By following the steps, one can achieve a safer eating experience while preserving dignity and self‑reliance.
The article is organized into clear sections, each building on the previous one. Readers will learn how to evaluate existing utensils, select appropriate modifications, and apply finishing touches that last. In addition, practical tips, common pitfalls, and a concise product summary are provided for quick reference.
What You Will Need
- Standard stainless‑steel fork, spoon, and knife (any set you already own)
- Non‑slip foam tubing or built‑up grip sleeves (see product recommendations)
- Scissors or a sharp utility knife
- Sandpaper (fine grit) for smoothing edges
- Heat‑shrink tubing (optional for a polished finish)
- Adhesive silicone pads (optional for extra cushioning)
All of the suggested commercial items are available on Amazon and include detailed specifications, price, and customer ratings.
Step 1: Assess Existing Utensils
The first step is to examine each utensil for size, weight, and handle shape. Identify handles that are thin, smooth, or lack texture, because these are the most difficult for a hand with reduced sensation to control. Measure the diameter of the handle with a ruler; a diameter of less than 0.5 inches often indicates insufficient grip surface for neuropathic hands.
Take note of any sharp edges or rough spots that could cause discomfort. If the utensil is already weighted, it may provide additional stability, but excessive weight can increase fatigue. Document the findings in a short checklist so that you can match each utensil with the appropriate modification technique.
Step 2: Add Built‑up Handles for Stability
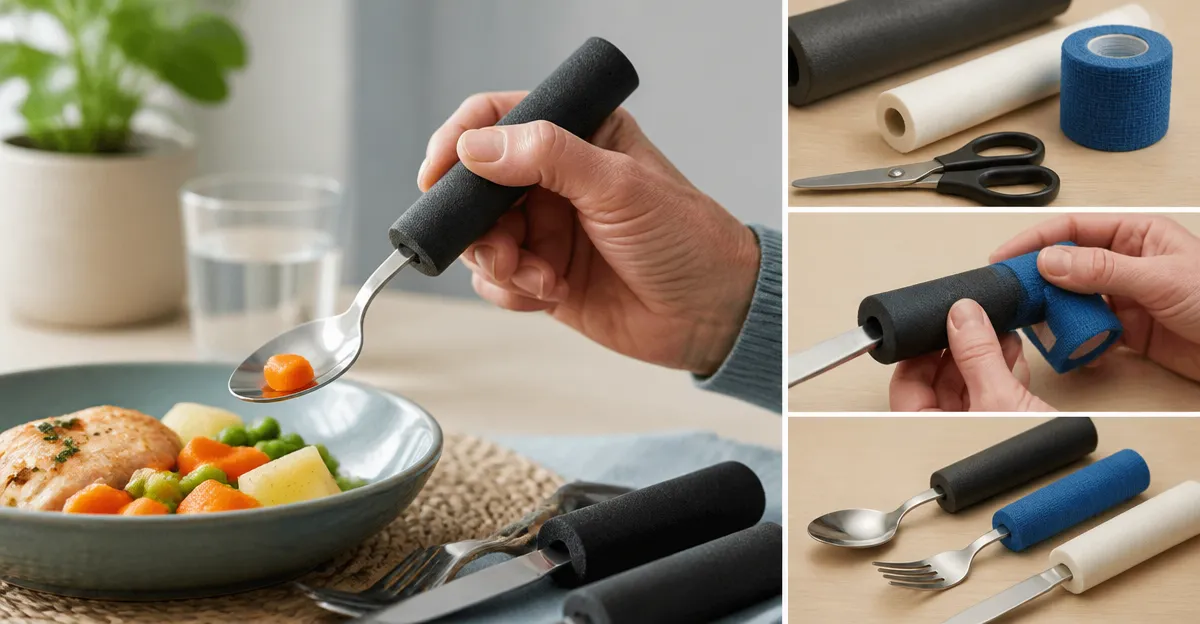
One of the most effective ways to improve grip is to increase the handle diameter with a built‑up sleeve. The Nourislif Adaptive Utensils Set demonstrates how a contoured, enlarged handle can provide a steady, easy grip for users with tremors or arthritis. Although the set includes complete utensils, the design principle can be applied to any existing fork, spoon, or knife by adding a similar sleeve.
To replicate this effect, cut a piece of foam tubing (see Step 3) to a length that covers the entire handle. Slide the tubing onto the utensil and secure it with a small amount of silicone adhesive if needed. The enlarged diameter distributes pressure across a larger area of the palm, reducing the effort required to maintain control.
The benefits of a built‑up handle include increased leverage, reduced slippage, and a more ergonomic hand position. Compared with wrapping tape, foam sleeves offer a softer, non‑abrasive surface that does not irritate sensitive skin.
Step 3: Choose the Right Foam Grip Tubing
Foam grip tubing is a versatile solution that can be cut to any length and applied to a variety of tools. The Lyforx Foam Grip Tubing set includes six tubes in three inner diameters, allowing you to select the optimal fit for each utensil. The yellow tube (0.27 in inner diameter) is ideal for thin handles, while the blue tube (0.71 in inner diameter) works well for larger, heavier utensils.
To install, measure the handle, cut the tubing with scissors, and slide it over the metal shaft. The non‑slip coating ensures that the tube remains in place even when wet, which is essential for soup or sauce consumption. The water‑resistant material also simplifies cleaning; simply rinse under warm water or place the utensil in a dishwasher after the adhesive has cured.
Because the tubing can be trimmed repeatedly, it accommodates future changes in hand strength or preference. Users who experience fluctuating symptoms may benefit from swapping tubes of different thicknesses as needed.
Step 4: Secure the Tubing with Heat‑Shrink (Optional)
If a tighter fit is desired, heat‑shrink tubing can be applied over the foam sleeve. This step is optional but provides a professional appearance and prevents the foam from slipping during vigorous use. Cut a piece of heat‑shrink tubing slightly longer than the foam sleeve, slide it over the utensil, and apply gentle heat with a hair dryer until the tubing contracts.
The resulting composite handle combines the softness of foam with the durability of shrink tubing. This hybrid approach is especially useful for users who require a firm grip during high‑intensity activities such as cutting meat.
Step 5: Add Silicone Pads for Extra Cushion
For individuals with hypersensitivity, a thin silicone pad placed between the foam sleeve and the hand can further reduce pressure points. Silicone pads are soft, hypoallergenic, and easy to replace. Cut the pad to match the handle length and adhere it with a small amount of food‑grade adhesive.
This additional layer creates a tactile barrier that moderates temperature changes, preventing the metal from feeling too cold or too hot. It also adds a subtle vibration‑dampening effect, which can be beneficial for users with tremor‑induced shaking.
Step 6: Test the Modified Utensils
After completing the modifications, perform a functional test with a typical meal. Observe the ease of lifting, scooping, and cutting. Ask the user to describe any discomfort, slippage, or excessive effort. Adjust the tubing length or replace the inner diameter if the grip feels too loose or too tight.
Document the final configuration for future reference. A simple table noting utensil type, tube size, and any additional pads will simplify re‑creation if the user loses or damages a utensil.
Step 7: Consider Portable Sets for Out‑of‑Home Use
When dining outside the home, a compact travel kit ensures that the user always has access to modified utensils. The BUNMO Adaptive Utensils Set includes a canvas travel wrap that protects the utensils and keeps them organized. Although the set already features foam handles, the same foam tubing technique can be applied to further personalize the grip.
Traveling with a dedicated set reduces reliance on restaurant cutlery, which may be ill‑suited for neuropathic hands. The discreet wrap also maintains privacy, allowing the user to eat with confidence in public settings.
Step 8: Explore Bendable Options for Custom Angles
Some users benefit from a bent handle that aligns with the natural curve of the palm. The Bendable Adaptive Utensils Set offers fork, spoon, and knife handles that can be flexed into a preferred position. While the bendable design is built into the utensil, adding foam tubing can still improve comfort.
To use, gently bend the handle until it rests comfortably against the hand. Secure the angle with a small piece of tape if necessary. This customization reduces the need for excessive wrist extension, which can be painful for users with neuropathy‑related muscle weakness.
Step 9: Evaluate Alternative Lightweight Sets
For users who prefer a lighter utensil without built‑in weight, the Vive Adaptive Utensil Set provides a ribbed composite handle that offers a firm grip without added mass. Pairing this set with foam tubing can create a hybrid solution that balances weight and comfort.
Choosing between weighted and non‑weighted options depends on personal preference and the degree of hand tremor. Weighted utensils can dampen shaking, while lighter utensils reduce fatigue during prolonged meals.
Tips & Pro Tips
- Start with the thinnest foam tube and work upward; a tighter fit provides more control.
- When cutting foam, use a straight edge to ensure an even length and avoid jagged edges that could irritate the skin.
- Test the modified utensil with both dry and wet foods; some users find that moisture reduces slippage, while others need additional non‑slip coating.
- Store modified utensils in a dry, ventilated container to prevent moisture buildup, which can degrade adhesive over time.
- Replace foam sleeves every six months or when they show signs of wear, as loss of elasticity can diminish grip security.
Troubleshooting
| Problem | Possible Cause | Solution |
|---|---|---|
| Utensil slips during use | Tube diameter too large or surface is smooth | Switch to a smaller inner‑diameter tube or add a silicone pad for extra friction. |
| Grip feels too bulky | Excessive foam length or double layers | Trim the foam to the minimum length needed to cover the handle. |
| Foam becomes soggy after washing | Water‑absorbing foam | Ensure the foam is the water‑resistant variety (Lyforx) and allow it to air dry completely before storage. |
| Handle bends too easily | Using bendable set without reinforcement | Apply a thin layer of heat‑shrink tubing over the bendable section to increase rigidity. |
Conclusion
Modifying utensils for peripheral neuropathy does not require expensive equipment; simple materials such as foam grip tubing can transform ordinary silverware into ergonomic tools that enhance independence. By assessing each utensil, adding built‑up handles, and customizing angles, one can create a personalized eating experience that reduces fatigue and improves safety. The optional product recommendations provide ready‑made solutions for users who prefer a turnkey approach, while the DIY methods ensure flexibility and cost‑effectiveness.
Readers are encouraged to experiment with the techniques described, record their preferences, and share successful configurations with caregivers and support groups. Consistent use of adapted utensils can lead to measurable improvements in nutrition intake, confidence, and overall quality of life.
Products Mentioned in This Guide
Frequently Asked Questions
What materials are best for creating non‑slip grips on utensils?
Soft foam tubing, silicone sleeves, or textured rubber grips are inexpensive and provide secure, comfortable handles.
How do I safely cut and attach grip sleeves to a fork or spoon?
Measure the handle, cut the tubing to length, then slide it on and secure with a small dab of food‑safe adhesive or heat‑shrink tubing.
Can commercial adaptive utensils replace DIY modifications?
Yes, pre‑made weighted or ergonomically‑shaped utensils work well, but DIY options are cheaper and customizable.
What maintenance is needed for modified utensils?
Wipe the grips with mild soap and water after each use and replace foam sleeves when they become worn or slippery.
Are there any safety concerns when using modified utensils?
Ensure the grip material is food‑grade, firmly attached, and does not interfere with the utensil’s balance to avoid accidental drops.