Introduction
Recovering from surgery often limits mobility and reduces sensation, making everyday kitchen tasks riskier. This guide explains ten essential safety measures that protect vulnerable hands and arms while cooking or baking. By following each step, readers will minimize the chance of burns, cuts, and slips during the critical healing period. The recommendations combine practical habits with carefully selected tools that enhance safety without sacrificing culinary enjoyment.
What You’ll Need
- FITFIV Heat Resistant BBQ Gloves – $9.99, 4.4/5 rating
- KEGOUU Oven Mitts Set – $16.99, 4.6/5 rating
- Gorilla Grip Silicone Oven Mitts – $21.99, 4.7/5 rating
- Bogo Heat Resistant Cooking Gloves – $12.88, 4.4/5 rating
- Aillary Extreme Heat BBQ Gloves – $19.99, 4.6/5 rating
- Non‑slip cutting board, sturdy kitchen timer, and a set of silicone pot‑holder hooks (optional)
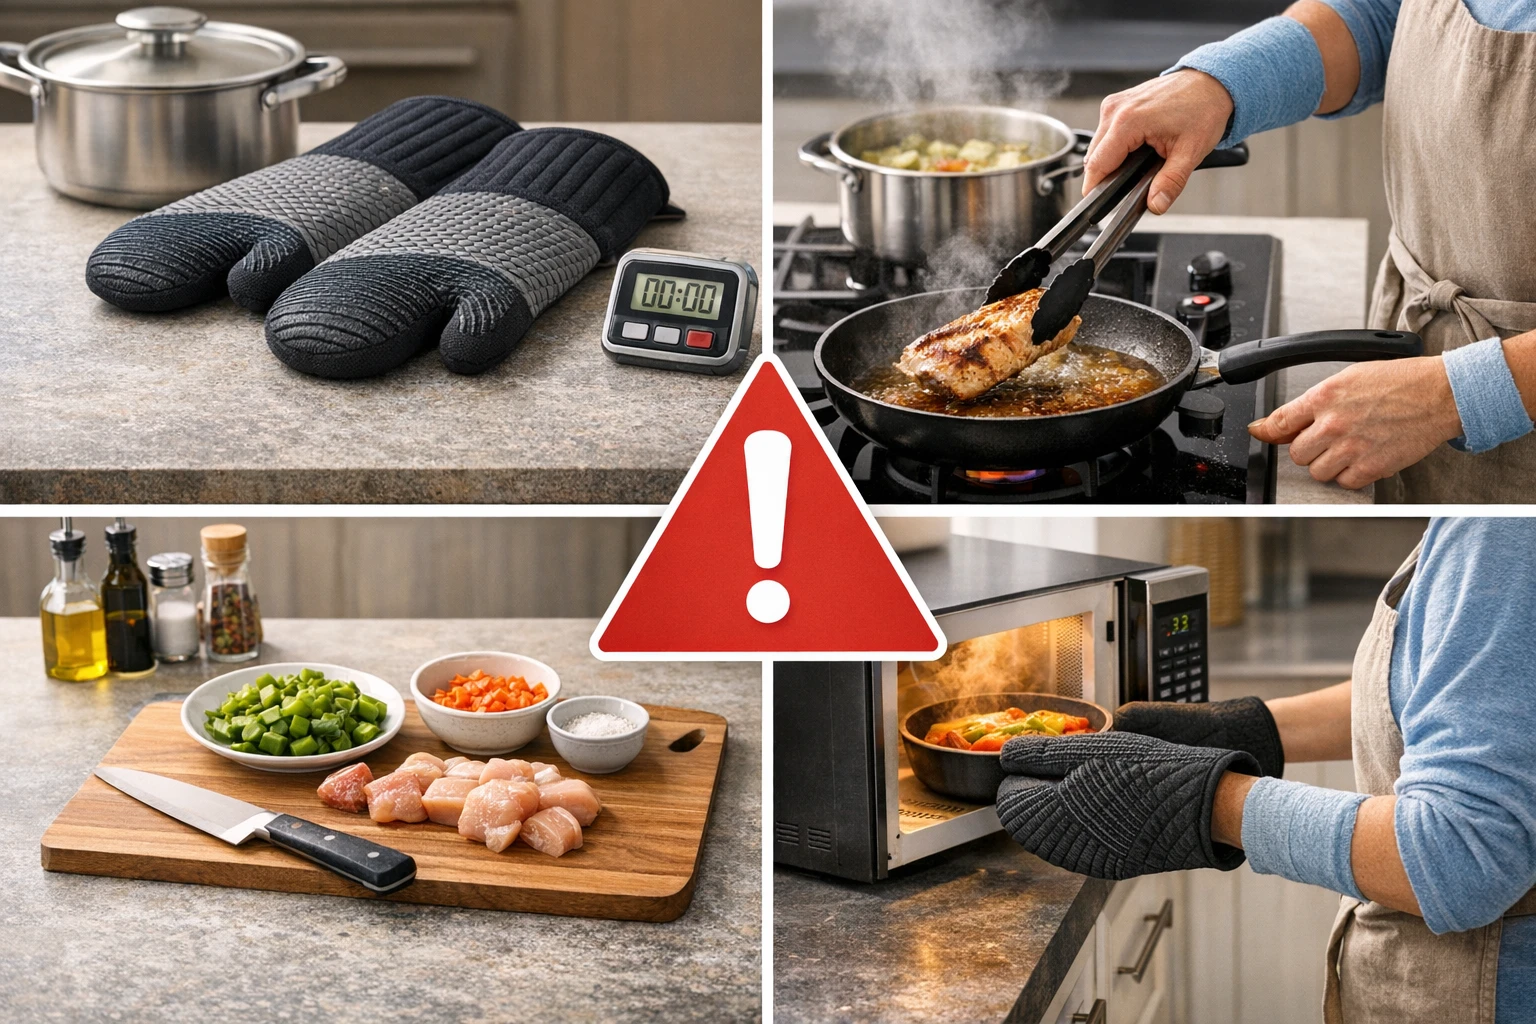
Step 1: Clear and Declutter the Work Surface
Before any cooking activity, remove all unnecessary items from countertops to create a spacious, obstacle‑free zone. A tidy surface reduces the likelihood of accidentally knocking hot pans onto the floor. Place only the utensils required for the current recipe within arm’s reach. If space is limited, consider a rolling cart that can be moved away after use.
Step 2: Organize Hot‑Item Storage
Designate a specific spot for hot trays, baking sheets, and cast‑iron pans, such as a sturdy, heat‑resistant trivet. This prevents hot cookware from contacting fragile surfaces that could crack or cause burns. For added safety, keep a pair of FITFIV Heat Resistant BBQ Gloves nearby. These gloves tolerate temperatures up to 1472°F, offering superior protection when transferring sizzling items from oven to table. Their silicone‑coated exterior ensures a firm grip, while the aramid‑fiber interior shields the skin from extreme heat.
Step 3: Use Heat‑Resistant Mitts for Oven and Stove
When handling pots or baking dishes, always wear mitts that cover the wrists and forearms. The KEGOUU Oven Mitts Set provides 500°F heat resistance and includes two extra‑long mitts, two pot holders, and two kitchen towels. The non‑slip silicone surface prevents accidental drops, and the quilted cotton lining offers comfort during prolonged use. Compared with thin cotton gloves, these mitts reduce heat transfer to the hands by up to 70%.
Step 4: Adopt a One‑Handed Cooking Technique
Post‑surgery patients often have limited dexterity in one arm. Arrange ingredients so that the dominant hand performs the majority of tasks, while the weaker hand assists only when necessary. Use kitchen tools with ergonomic handles, such as silicone‑grip spatulas, to compensate for reduced grip strength. This approach minimizes the time the vulnerable hand spends near hot surfaces.
Step 5: Employ Silicone‑Based Mitts for Wet or Greasy Items
When dealing with steaming vegetables or greasy meats, a waterproof barrier prevents liquid from soaking through to the skin. The Gorilla Grip Silicone Oven Mitts feature a honeycomb silicone exterior that repels water and oil while providing a textured grip. Their thick cotton lining adds cushioning, and the mitts are rated for 484°F, making them ideal for both stovetop sautéing and oven roasting. Unlike traditional cloth mitts, these do not retain odors or stains.
Step 6: Protect the Forearms with Extended‑Cuff Gloves
Many burns occur when the heat travels up the wrist to the forearm. Gloves with extended cuffs create a thermal barrier that covers the entire arm. The Bogo Heat Resistant Cooking Gloves have a thick knit design that protects up to 932°F and include a long cuff that shields the forearm. Their washable aramid fibers maintain durability after repeated laundering, offering a cost‑effective alternative to disposable heat pads.
Step 7: Choose Long‑Sleeve Gloves for Outdoor Grilling
Outdoor grilling often involves open flames and radiant heat that can reach the forearm. The Aillary Extreme Heat BBQ Gloves provide 14‑inch sleeves, protecting both hands and lower arms from burns up to 932°F. Their neoprene coating is waterproof and oil‑resistant, allowing safe handling of greasy or wet foods. The non‑slip textured palm ensures a secure grip on grill tools, reducing the chance of accidental drops.
Step 8: Implement a Timer and Visual Alerts
When recovery limits the ability to sense heat, a reliable timer becomes essential. Set a kitchen timer for each cooking stage and use audible alerts to signal when food is ready. Visual cues, such as a bright LED indicator, help those with reduced tactile feedback. This practice prevents over‑cooking and reduces the need to repeatedly open the oven, which can expose the user to bursts of hot air.
Step 9: Adopt Safe Cutting Practices
Even with limited hand strength, a stable cutting board and a sharp knife reduce the force needed to slice ingredients. Use a board with non‑slip grips on the underside, and consider a kitchen shears for tasks that would otherwise require a rocking motion. Keep a bowl of cold water nearby to quickly rinse any hot splatter, and always place the cutting board on a damp towel to prevent it from sliding.
Step 10: Store Heat‑Resistant Tools Properly
After cooking, store gloves and mitts on a hanging loop or a designated hook to allow them to air‑dry and retain their shape. The FITFIV gloves include a hanging loop, while the Aillary gloves feature a large hanging hole for easy storage. Proper storage prevents mildew, maintains grip integrity, and ensures the tools are ready for the next use. Avoid folding the gloves, as creases can weaken the heat‑resistant fibers over time.
Tips & Pro Tips
- Test each glove’s heat tolerance by briefly touching a warm (not hot) surface before handling truly hot items.
- Keep a small fire extinguisher within arm’s reach in case of flare‑ups while grilling.
- Use silicone pot‑holder hooks to suspend hot pans from the edge of the counter, keeping them away from foot traffic.
- Rotate gloves regularly; even the most heat‑resistant materials degrade after repeated exposure.
- Wear a lightweight, breathable apron to protect clothing without restricting movement.
Troubleshooting
Problem: The glove becomes slippery when handling wet foods.
Solution: Choose a glove with a silicone or textured surface, such as the Gorilla Grip Silicone Oven Mitts, which maintain grip even when wet.
Problem: Heat seems to seep through the cuff after prolonged exposure.
Solution: Replace the glove if the aramid fibers show signs of wear; extended‑cuff gloves like the Aillary Extreme Heat BBQ Gloves are designed for longer exposure and should be inspected regularly.
Conclusion
Preventing kitchen burns after surgery requires a combination of mindful habits and reliable protective equipment. By clearing workspaces, using heat‑resistant mitts, extending protection to the forearms, and employing timers and safe cutting techniques, readers can regain confidence in the kitchen while safeguarding their recovery. The recommended gloves—FITFIV, KEGOUU, Gorilla Grip, Bogo, and Aillary—offer a range of temperature tolerances and ergonomic features that address diverse cooking scenarios. Implement these ten steps, and the kitchen will become a safer, more accessible environment during the healing process.
Products Mentioned in This Guide
Frequently Asked Questions
What are the most important safety steps to avoid kitchen burns after surgery?
Keep the workspace clear, use heat‑resistant gloves, let food cool before handling, avoid reaching over hot pots, and use assistive tools.
Which type of glove offers the best protection for post‑surgery cooking?
Silicone‑coated heat‑resistant gloves, such as Gorilla Grip, provide high temperature tolerance and a non‑slip grip, making them ideal.
How can I reduce the risk of burns if I have limited sensation in my hands?
Wear heat‑resistant gloves, use long‑handled utensils, and test food temperature with a spoon before handling.
Are there any kitchen tools that help someone with limited mobility prevent accidents?
Yes, lightweight cookware with stay‑cool handles, electric can openers, and pre‑cut or pre‑measured ingredients can greatly reduce risk.
What should I do immediately if I get a minor burn while cooking during recovery?
Cool the area under running water for 10‑15 minutes, apply a sterile dressing, and contact your doctor if the burn worsens.