How to Customize Utensils with Grip Tape and Moldable Resin: Step-by-Step DIY Non‑Slip Handle Tutorial
Introduction
In many households, everyday utensils become challenging for seniors, individuals with arthritis, or anyone with reduced hand strength. This guide teaches readers how to transform ordinary forks, spoons, knives, and even personal‑care tools into ergonomic, non‑slip implements using foam grip tubing and custom‑molded resin handles. By the end of the tutorial, one will understand the materials required, the precise steps for installation, and how to achieve a professional finish that enhances safety and independence.
The tutorial balances practical instructions with explanations of why each product is chosen, ensuring that readers can follow the process with or without purchasing the recommended tools. The approach is suitable for DIY enthusiasts, occupational‑therapy professionals, and caregivers seeking reliable, cost‑effective solutions.
What You’ll Need
- Foam grip tubing (choose a set that offers multiple diameters)
- Silicone resin molds for custom handles
- Clear epoxy or casting resin
- Mixing cups and stir sticks
- Scissors or a utility knife
- Sandpaper (fine grit) and a polishing cloth
- Protective gloves and a well‑ventilated workspace
- Cleaning supplies (soap, water, a soft cloth)
Below are the recommended products that satisfy the above list while offering proven quality and user satisfaction.
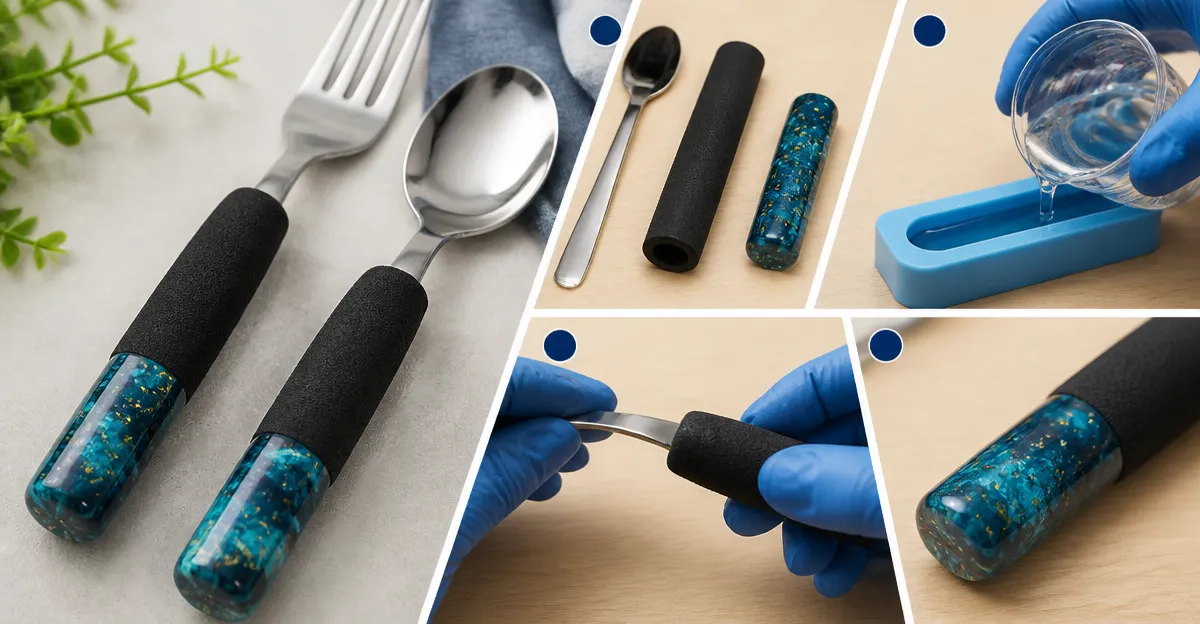
Step 1: Prepare Your Utensils
Begin by selecting the utensils that require improvement. Clean each item thoroughly with warm, soapy water and dry it completely. Removing grease and residue ensures that the foam tubing adheres securely and that the resin does not trap contaminants.
If the utensil handles are worn or have sharp edges, lightly sand them with fine‑grit sandpaper. This creates a slightly rough surface, which improves the grip of both foam tubing and resin.
Step 2: Choose the Appropriate Foam Grip Tubing
Foam tubing adds a cushioned, non‑slip layer that reduces the effort needed to hold an object. For most household cutlery, a medium‑diameter tube provides the best balance between comfort and control.
Two highly rated options are available:
- YIBEICO Foam Grip Tubing – a 10‑tube set offering five sizes, ideal for forks, spoons, toothbrushes, and pens. The product features an ergonomic, adaptive design, a non‑slip coating, and a price point that reflects its high‑quality material.
- Vive Foam Tubing – a 9‑piece assortment with three diameter options and vibrant colors. Each tube is 12 inches long, allowing users to cut to custom lengths. The set is FSA/HSA eligible and carries a 4.4‑star rating from over 2,200 reviewers.
If the user prefers a no‑cut solution, the Fampery Foam Grip Tubing 8‑pack provides pre‑sized tubes that slide on instantly, eliminating the need for scissors.
Select the tube diameter that matches the handle width of your utensil. For a standard fork, a tube with an outer diameter of approximately 1 cm (0.4 in) is recommended.
Step 3: Apply the Foam Grip Tubing
Follow these steps to install the foam tubing:
- Measure the length of the handle you wish to cover. Mark the desired length on the foam tube with a fine‑point marker.
- Cut the tube cleanly using scissors. A straight cut prevents uneven edges that could catch on clothing.
- Slide the cut tube onto the utensil handle, starting at the base and working toward the tip. Apply gentle pressure to ensure a snug fit; the non‑slip coating should grip the metal without additional adhesives.
- If the tube feels loose, wrap a thin layer of silicone adhesive around the base of the handle before re‑installing the tube. This step is optional and only necessary for very smooth surfaces.
After installation, test the grip by holding the utensil with a light squeeze. The foam should compress slightly, providing a cushioned feel while remaining firm enough to prevent slipping.
Step 4: Design and Cast Custom Resin Handles
For users who desire a more permanent, decorative solution, custom resin handles can be molded using silicone molds. The Heyiminy Resin Molds provide two sizes (long and short) suitable for most utensil shafts.
Materials needed for this step include clear epoxy resin (available at craft stores), a mixing cup, and a stir stick. Follow the resin manufacturer’s safety instructions, wearing gloves and working in a well‑ventilated area.
- Prepare the silicone mold by cleaning it with soap and water, then drying it thoroughly.
- Mix the resin and hardener according to the package directions. Stir slowly to minimize bubbles.
- Optional: Add pigments, glitter, or dried flowers to the mixture for a personalized aesthetic.
- Pour the resin into the mold, filling it to the desired height. Insert the utensil shaft (or a wooden dowel of matching diameter) into the resin so that the molded handle will encircle the existing handle.
- Allow the resin to cure fully—typically 24 hours for most epoxies.
- Once cured, gently demold the handle by twisting the silicone mold. If resistance is felt, flex the mold slightly to release the piece.
The resulting resin handle offers a rigid, waterproof grip that can be sanded to a smooth finish. It also provides an opportunity for creative expression, making each utensil unique.
Step 5: Finish and Attach the Resin Handles
After demolding, inspect the resin handle for sharp edges. Use fine‑grit sandpaper to smooth any imperfections, then wipe the surface with a damp cloth.
To attach the resin handle to the utensil:
- Apply a thin bead of silicone adhesive around the base of the original handle.
- Slide the resin handle onto the adhesive‑coated shaft, aligning it carefully.
- Press firmly for 30 seconds, then allow the adhesive to cure according to the manufacturer’s instructions (usually 2–4 hours).
If the user prefers to keep the foam grip underneath the resin, the foam tube can remain in place; the resin will encapsulate it, providing an extra layer of comfort.
Tips & Pro Tips
- Color Coordination: Match foam tube colors to the utensil’s aesthetic for a cohesive look. The Vive set offers blue, red, and green options.
- Temperature Considerations: Resin cures faster in warm environments. If working in a cool room, extend the cure time to avoid tackiness.
- Safety First: Always wear nitrile gloves when handling resin and work in a space with adequate airflow to prevent inhalation of fumes.
- Batch Production: Create multiple handles at once to save time. The long and short molds allow you to produce handles for forks, spoons, and even larger kitchen tools such as ladles.
- Maintenance: Foam grips can be removed and washed with mild soap. Resin handles are dishwasher safe once fully cured.
Troubleshooting
| Problem | Possible Cause | Solution |
|---|---|---|
| Foam tube slides off | Insufficient friction or improper size | Choose a tube with a slightly larger outer diameter or apply a thin silicone adhesive. |
| Resin bubbles | Rapid mixing or pouring | Stir slowly, tap the mold gently after pouring, and consider using a vacuum chamber for professional results. |
| Handle feels too bulky | Tube length too long | Trim the foam tube to a shorter length before installation. |
Conclusion
By following this guide, one can convert standard kitchen and personal‑care tools into ergonomic, non‑slip instruments that promote independence and safety. The combination of high‑quality foam grip tubing and custom‑molded resin handles offers both functional comfort and aesthetic customization. Whether the project is undertaken for a single utensil or an entire set, the methods described are scalable, cost‑effective, and adaptable to a wide range of user needs.
Readers are encouraged to experiment with colors, textures, and shapes, turning a simple DIY task into an opportunity for creative expression while enhancing daily living.
Products Mentioned in This Guide
Frequently Asked Questions
What materials are needed to create a non‑slip utensil handle?
You need foam grip tubing, silicone resin molds, clear epoxy or casting resin, and optional sandpaper and sealant.
Can I use regular grip tape instead of foam tubing?
Foam grip tubing is preferred for cushioning, but adhesive grip tape can work if it’s thick enough and applied securely.
How long does the resin need to cure before the utensil is safe to use?
Most clear epoxy cures in 24 hours at room temperature, but follow the manufacturer’s recommended time for full hardness.
Is this DIY method safe for food‑contact utensils?
Yes, when you use food‑grade epoxy or casting resin and cure it completely, the finished handle is safe for normal kitchen use.
Can I customize handles for knives or only for forks and spoons?
The technique works for any handheld tool, including knives, scissors, and personal‑care items, as long as the handle can be encased in the mold.