How to Teach Cooking Skills to Teens with Low Vision: Practical Techniques, Kitchen Safety, and Adaptive Tools
Introduction
This guide explains how to create an inclusive cooking environment for teenagers with low vision. Readers will learn how to adapt workstations, select appropriate adaptive tools, and teach essential culinary techniques safely. By following the outlined steps, educators and parents can foster independence, confidence, and healthy eating habits in low‑vision teens. The information balances practical instruction with product recommendations, ensuring value even without purchasing any items.
What You’ll Need
- Adaptive grip aids such as Foam Grip Tubing for utensils and tools.
- Heat‑resistant meat chopper like the Meat Chopper for handling ground foods.
- Accurate temperature devices: Instant Read Thermometer and Talking Thermometer.
- High‑contrast measuring cups, tactile marking tape, and a well‑lit workspace.
Step‑by‑Step Instructions
1. Prepare the Kitchen Environment
Begin by organizing the kitchen so that all surfaces are free of clutter and clearly defined. Use contrasting colors for countertops and backsplashes to help the teen locate items by sight and touch. Install bright, adjustable lighting above work areas; a 500‑lux level reduces visual strain and improves depth perception. Position frequently used appliances within arm’s reach and label them with Braille or raised symbols.
Safety is paramount; ensure that the stove controls have tactile markers and that the hot‑plate surface is covered with a heat‑resistant mat. Place non‑slip mats near the sink to prevent accidental slips when handling wet utensils. This preparation creates a predictable environment, allowing the teen to focus on skill acquisition rather than navigation.
2. Organize Adaptive Tools
Introduce the Foam Grip Tubing as a simple way to improve grip on knives, spatulas, and measuring spoons. The tubing is made of soft, water‑resistant foam that can be cut to length, providing a custom fit for each hand. Its non‑slip coating prevents the tool from sliding, reducing the risk of cuts and spills. The set costs $9.99, has a 4.3‑star rating from 476 reviewers, and is designed for individuals with arthritis, tremors, or limited dexterity.
Demonstrate how to slide a piece of tubing onto a wooden spoon, then secure it with a gentle twist. Explain that the larger diameter (blue) is suitable for thicker handles, while the smaller (yellow) works for slimmer tools. Encourage the teen to experiment with different sizes until the grip feels comfortable. This tactile adaptation empowers the learner to handle utensils confidently.
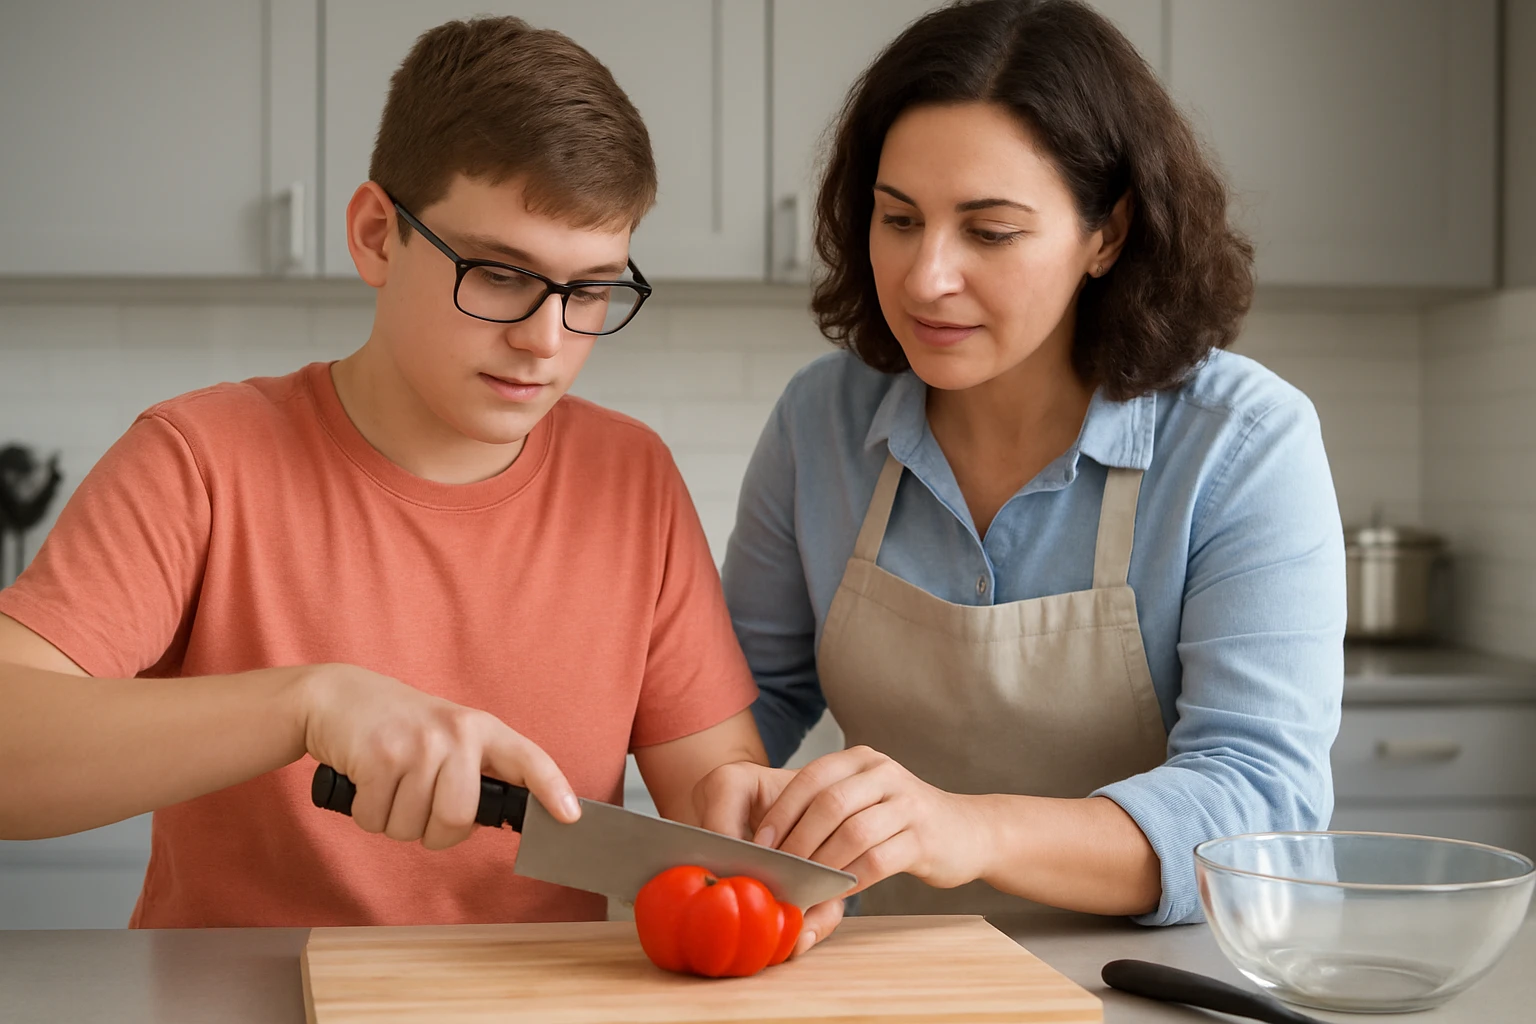
3. Teach Basic Knife Skills with Safety
When introducing knives, start with a chef’s knife that has a rounded tip and a sturdy, non‑slipping handle. Apply a piece of Foam Grip Tubing to the handle to increase the surface area and reduce hand fatigue. Emphasize the “claw” grip: fingers curled inward, fingertips tucked, and the knuckles guiding the blade. This technique keeps the cutting edge away from the hand.
Practice with soft foods such as ripe tomatoes or boiled potatoes before moving to tougher ingredients. Use a cutting board with raised edges to prevent the board from sliding. Explain that the teen should always place the knife blade on a stable surface before lifting, and that the blade should be rested on the board when not in use. Reinforce these habits with verbal cues and tactile feedback.
4. Master Measuring and Mixing
Accurate measuring is essential for consistent results. Provide measuring cups and spoons that feature raised dots at each measurement level. For low‑vision teens, attach a piece of Foam Grip Tubing to the handles to improve stability while pouring.
When mixing, introduce the Meat Chopper. This tool contains five beveled pinwheel blades that effortlessly break down ground meat, potatoes, or soft vegetables. It is constructed from food‑grade nylon, is heat‑resistant up to 428 °F, and is dishwasher safe. Priced at $7.99 with a 4.7‑star rating from over 15,000 reviews, it offers a non‑metallic alternative to traditional forks, reducing the risk of splatter and uneven texture. Demonstrate how to press the chopper into a bowl of seasoned ground beef, then rotate to achieve the desired consistency.
Encourage the teen to use the chopper for both mixing and mashing, highlighting how the angled blades scrape the sides of the bowl, ensuring no ingredients are left unmixed. This tactile feedback reinforces the sense of completion for each recipe step.
5. Use Temperature Tools Effectively
Accurate temperature monitoring prevents under‑cooking and over‑cooking, which is especially important for food safety. Introduce the Instant Read Thermometer, a digital device with a 1‑second response time and a 180° auto‑rotating backlit display. Its motion‑sensing wake function activates when the probe is lifted, conserving battery life for up to 3,000 hours. The probe is stainless steel, food‑grade, and the unit costs $12.99 with a 4.7‑star rating from 55,000 reviewers.
Demonstrate how to insert the probe into the thickest part of a chicken breast, wait for the reading, and then lock the temperature on the display for reference. Explain the importance of reading the temperature away from direct heat to avoid false readings. For teens who prefer auditory feedback, the Talking Thermometer provides a voice broadcast of the temperature at the press of a button. It offers a measurement range from –58 °F to 572 °F, an accuracy of ±1.8 °F, and a bright LCD screen. Although the price is not listed, its 4‑star rating indicates reliable performance for visually impaired users.
Compare the two devices: the Instant Read Thermometer is ideal for quick, precise readings, while the Talking Thermometer adds auditory confirmation, useful in noisy or low‑light environments. Encourage the teen to choose the device that best matches their learning style.
6. Practice Clean‑up and Organization
Teaching proper clean‑up reinforces responsibility and maintains a safe kitchen. Show the teen how to rinse the Meat Chopper under running water, then place it in the dishwasher if desired. Emphasize that the chopper’s non‑stick surface prevents food from adhering, simplifying cleaning.
Store grip‑enhanced utensils in a dedicated drawer lined with a tactile mat, allowing the teen to locate each tool by touch. Label the drawer with raised letters or Braille stickers. Finally, demonstrate how to safely store the thermometers: the Instant Read Thermometer can be attached to a magnetic strip on the refrigerator, while the Talking Thermometer can be hung on a hook near the prep area.
Tips & Pro Tips
- Use high‑contrast, textured placemats to define work zones.
- Introduce a “talk‑back” system: the teen describes each action aloud, reinforcing muscle memory.
- When using the Meat Chopper, apply steady pressure rather than rapid shaking to achieve uniform texture.
- For the Talking Thermometer, adjust the volume setting before cooking to ensure the voice is audible over background noise.
- Schedule short, frequent practice sessions rather than long, infrequent ones to build confidence gradually.
Troubleshooting
- Problem: Grip tubing slips off during use.
Solution: Ensure the tubing is tightly twisted onto the handle and consider using the larger diameter for thicker tools. - Problem: Thermometer reading fluctuates.
Solution: Insert the probe fully into the food’s center, avoid touching bone or fat, and wait a full second for the reading to stabilize. - Problem: Meat Chopper blades become dull.
Solution: Clean the blades after each use and avoid using the chopper on hard vegetables such as carrots; reserve it for soft or cooked ingredients.
Conclusion
This guide has outlined a systematic approach to teaching cooking skills to teens with low vision. By preparing an organized environment, employing adaptive grip aids, introducing safe knife techniques, mastering measuring, and utilizing reliable temperature tools, educators can empower low‑vision adolescents to cook independently. Continued practice, patience, and the selective use of tools such as the Meat Chopper, Foam Grip Tubing, Instant Read Thermometer, and Talking Thermometer will reinforce confidence and culinary competence.
Products Mentioned in This Guide


Frequently Asked Questions
What adaptive tools help teens with low vision handle kitchen utensils safely?
Foam grip tubing for handles and heat‑resistant meat choppers provide better control and reduce the risk of burns.
How can a kitchen workstation be organized for a low‑vision teen?
Arrange items in consistent, tactile zones, use high‑contrast labels, and keep frequently used tools within easy reach.
What safety measures are essential when teaching cooking to low‑vision teenagers?
Emphasize stove‑turn-off habits, use audible timers, keep knives in protective sheaths, and supervise heat‑related tasks.
Why is an instant‑read thermometer important for low‑vision cooking learners?
It gives an audible or clear digital readout of food temperature, ensuring foods are cooked safely without relying on visual cues.
Can low‑vision teens learn cooking skills without purchasing expensive equipment?
Yes; many techniques rely on simple adaptations like tactile markers, proper lighting, and low‑cost grip aids that can be homemade or inexpensive.