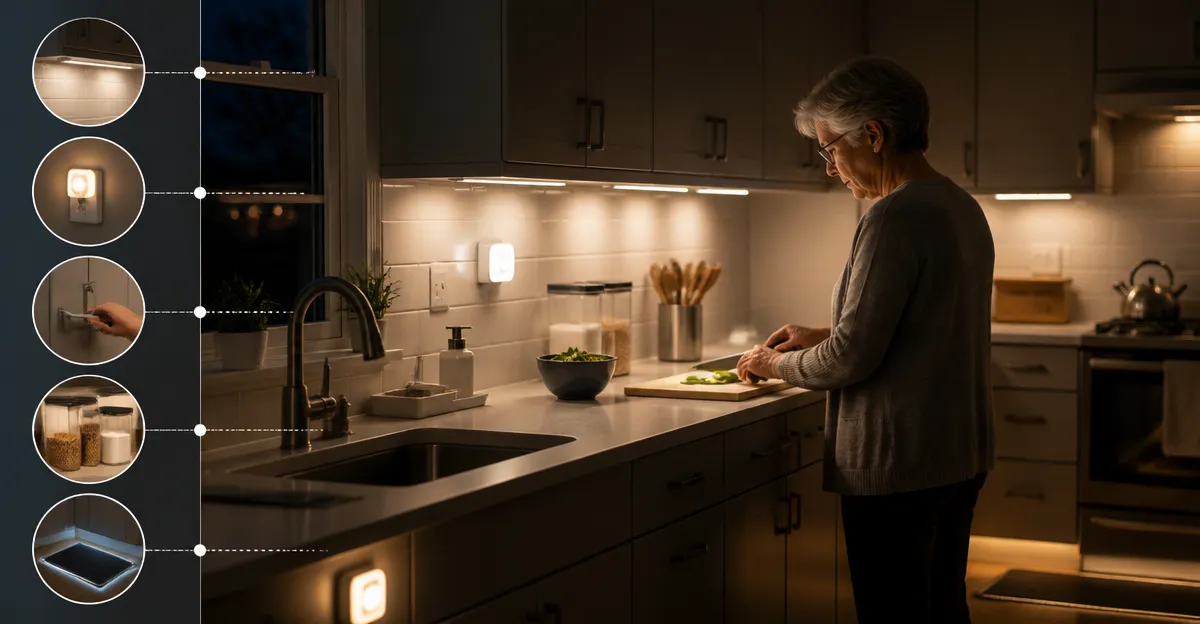
How to Set Up a Night‑Time Kitchen for Low Vision: Practical Lighting, Safety & Organization Tips
Introduction
Creating a kitchen environment that supports low vision after dark requires thoughtful lighting, clear pathways and organized storage. This guide explains how to assess needs, install motion‑sensor lighting, add supplemental night lights and arrange the workspace for safety. Readers will learn why each lighting tool matters, how to install it correctly and which affordable Amazon products perform best. By following the steps, one can reduce the risk of trips, improve visibility and maintain independence while cooking at night.
What You'll Need
- Motion‑activated ceiling or pendant bulbs
- Rechargeable under‑cabinet strip lights with magnetic mounts
- Battery‑operated stick‑on night lights for drawers and stairs
- Basic tools: screwdriver, adhesive pads, AA/AAA batteries
- Optional: adhesive hooks for cable management
Step 1: Evaluate Existing Lighting and Identify Dark Zones
Begin by walking through the kitchen with a light meter or a smartphone app set to low‑light mode. Note areas where illumination falls below 40 lux, especially around the stove, sink and pantry shelves. Record the distance from the ceiling to each work surface; this will determine the appropriate wattage for motion‑sensor bulbs. Understanding the layout allows one to place lighting tools where they will have the greatest impact on safety.
Step 2: Install Motion‑Sensor Ceiling Bulbs for General Illumination
Replace standard bulbs in open fixtures with Sengled Motion Sensor Light Bulb. The 8.8 W A19 LED provides 800 lumens, equivalent to a 60 W incandescent, while consuming 85 % less energy. Its PIR motion sensor activates within 8–30 feet in darkness and shuts off after 60–90 seconds of inactivity, ensuring hands‑free illumination when one enters the kitchen at night. At $11.62 and a 4.6‑star rating from 5,907 reviews, it offers reliable performance for both indoor and outdoor open fixtures; be sure the sensor faces downward and avoid enclosed or frosted covers.
Installation is straightforward: turn off power, remove the old bulb, screw in the new Sengled bulb and restore power. Test the sensor by walking into the room with the lights off; the bulb should illuminate promptly. If the sensor does not activate, verify that ambient light is below 40 lux and that the fixture is not obstructed.
Step 3: Add Rechargeable Under‑Cabinet Lighting for Task Areas
Under‑cabinet illumination is essential for reading labels, measuring ingredients and preventing spills. The MCGOR Under Cabinet Light comes in a 2‑pack, each strip measuring 10 inches and featuring a magnetic backing for quick attachment to metal surfaces. With five dimmable levels, users can select low brightness for night‑time navigation or full brightness for detailed cooking tasks.
Each unit houses a 1800 mAh USB‑C rechargeable battery that lasts 7–45 days in motion‑sensor mode and up to 8 hours on always‑on mode at 100 % brightness. At $16.99 and a 4.5‑star rating from 58,422 reviews, it offers long‑lasting convenience without the need for wiring. To install, clean the cabinet surface, align the magnetic strip, and press firmly; the included adhesive metal plates allow placement on non‑metallic surfaces as well.
Activate the motion‑sensor mode by pressing the sensor button; the light will turn on when movement is detected within a 120° cone and up to 10 feet away, then turn off after about 20 seconds of stillness. For tasks that require continuous light, toggle to the always‑on mode by a quick double‑press. Recharge the units with the supplied USB‑C cable when the indicator flashes amber.
Step 4: Deploy Small Stick‑On Night Lights for Drawers and Stairs
Even with ceiling and under‑cabinet lighting, narrow spaces such as pantry doors, drawer fronts and stair risers can remain shadowed. The STAR‑SPANGLED Motion Sensor Light provides a compact, battery‑operated solution that adheres with ultra‑adhesive pads. Each unit emits 80 lumens from eight high‑CRI LEDs, sufficient to illuminate a drawer interior without glare.
These lights detect motion within 120° and up to 16 feet, turning off after 20 seconds of inactivity. Powered by three AAA batteries (not included), they avoid any electrical wiring hazards, making them safe for children and pets. Priced at $9.99 with a 4.4‑star rating from 9,750 reviews, they are an economical addition for low‑vision users who need occasional illumination.
Install by peeling the backing from the adhesive pad, positioning the light on the desired surface, and pressing firmly. Adjust the rotating light bar to direct illumination toward the interior of a drawer or the edge of a stair. Replace batteries when the LED begins to dim or when the sensor no longer responds promptly.
Step 5: Use a Dedicated Night‑Time LED Strip for Broad Area Lighting
For larger kitchens, a rechargeable strip with adjustable color temperature can create a balanced ambient glow. The Gritin Under Cabinet Light offers 84 super‑bright LEDs, three selectable color temperatures (3000 K, 4500 K, 6000 K) and five brightness levels. Its magnetic mounting and included adhesive plates enable placement on both metal and non‑metal surfaces.
At $15.19 and a 4.6‑star rating from 21,142 reviews, this unit provides four lighting modes: OFF, Night Sensing, Daytime Sensing and Always‑On. The Night Sensing mode mirrors the behavior of the Sengled ceiling bulb, activating only in darkness, while Daytime Sensing works regardless of ambient light. This flexibility allows one to maintain a consistent light level throughout the evening without manually switching fixtures.
Charge the built‑in 1800 mAh battery via the supplied USB‑C cable; a full charge supports up to 8 hours of high‑brightness operation or 7–45 days in sensor mode, depending on usage frequency. Install by aligning the magnetic strip with a metal edge or using the adhesive plates for wooden cabinets, then test each mode to confirm proper sensor response.
Step 6: Organize Kitchen Tools and Supplies for Easy Access
Low vision users benefit from a decluttered workspace where frequently used items are stored within arm’s reach. Use clear containers with tactile labels, and consider contrasting colors for handles to aid visual differentiation. Position knives, cutting boards and measuring cups on the countertop closest to the primary light source, such as the Sengled motion bulb.
Label pantry shelves with large‑print or Braille stickers, and keep a small flashlight or the Mlambert Motion Sensor Night Light nearby for emergencies. The Mlambert unit, priced at $9.99 with a 4.5‑star rating from 4,410 reviews, offers 35 lumens from six SMD 2835 LEDs and activates within 10 feet in darkness, providing a quick visual cue when reaching for items in a dark pantry.
Arrange cords and appliance handles away from walkways to prevent tripping. Use cable clips that attach with magnets or adhesive pads, keeping the floor clear and reducing the chance of accidental snags.
Tips & Pro Tips
- Test motion sensors at different times of night; some sensors may require a minimum darkness level to trigger.
- When installing magnetic lights on painted wood, use the supplied adhesive plates to avoid damaging the finish.
- For maximum battery life, enable the “Always On” mode only when you need continuous illumination, such as during a long cooking session.
- Consider adding a voice‑activated smart plug to control the Sengled bulbs remotely if the motion sensor is insufficient for certain tasks.
- Regularly clean sensor lenses with a soft cloth; dust can reduce detection accuracy.
Troubleshooting
Motion sensor does not activate. Verify that ambient light is below the 40 lux threshold and that the sensor’s line of sight is not blocked by a fixture cover. Re‑orient the bulb so the sensor faces downward.
Under‑cabinet lights flicker or dim unexpectedly. Check battery charge level; a low‑charge battery can cause voltage drops. Replace the rechargeable battery or recharge via USB‑C.
Stick‑on night lights lose adhesion. Clean the surface with isopropyl alcohol before applying the adhesive pad. If the pad fails, replace it with a new 3M double‑sided tape.
Conclusion
By integrating motion‑sensor ceiling bulbs, rechargeable under‑cabinet strips and discreet stick‑on night lights, one can transform a dim kitchen into a safe, well‑lit workspace for low‑vision individuals. Proper organization, clear pathways and regular maintenance of lighting devices further enhance safety and independence. The recommended products provide reliable performance at modest cost, but the principles outlined remain effective even with alternative solutions. Implement these steps to enjoy cooking after dark with confidence and reduced risk.
Products Mentioned in This Guide
Frequently Asked Questions
What type of lighting is best for a low‑vision kitchen at night?
Use motion‑activated ceiling or pendant bulbs combined with rechargeable under‑cabinet strip lights for even, hands‑free illumination.
How do I install motion‑sensor lights safely?
Mount the sensor‑bulb fixture with a screwdriver, position the sensor to cover the main work area, and test the range before finalizing.
Can battery‑operated night lights help with drawer visibility?
Yes, stick‑on night lights provide low‑glow cues that make handles and contents visible without glare.
What’s the easiest way to manage cables and avoid tripping hazards?
Apply adhesive hooks or clips to route cords along the backsplash or under cabinets, keeping walkways clear.
How often should I check the batteries in my night‑time kitchen lights?
Inspect batteries every 3‑4 months and replace them promptly to ensure consistent performance.